How 3D Foam Letters and Logos Are Made for Events and Exhibitions
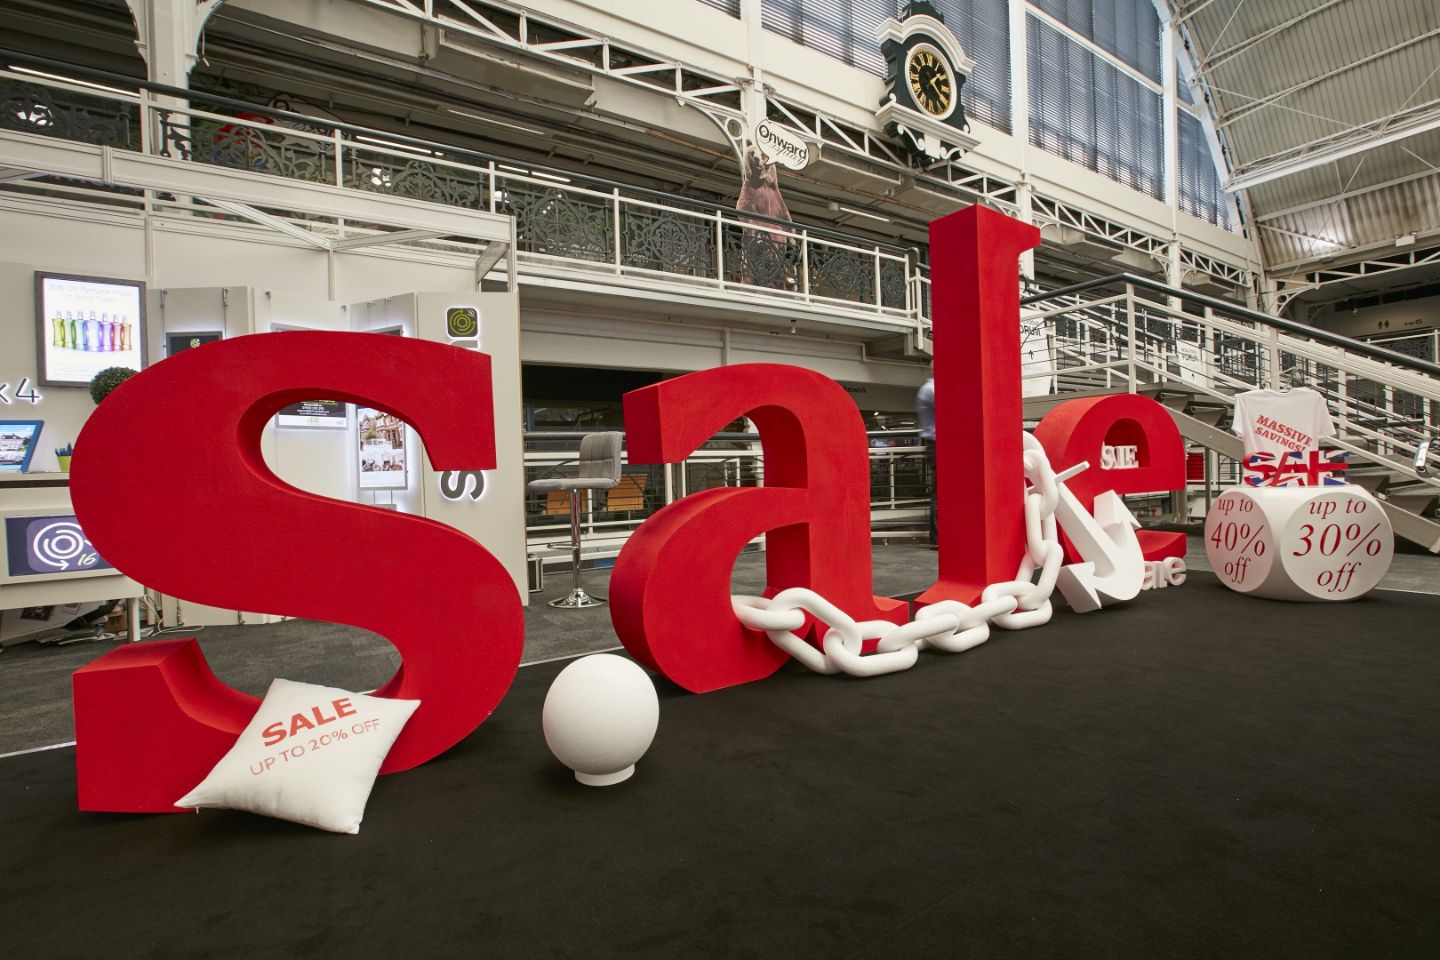
Large-scale lettering can transform an event space, exhibition stand or branded installation. It can provide a focal point for photographs, reinforce a campaign message and make a brand visible from across a busy venue.
Expanded polystyrene, commonly known as EPS, is frequently used to create this type of lettering because it is lightweight, adaptable and suitable for producing shapes at a wide range of sizes.
Understanding how foam letters are made can help event organisers, designers and marketing teams prepare a clearer brief. The process involves more than simply cutting a word from a block of foam. The fabricator must consider the artwork, dimensions, material density, cutting method, surface finish, support, transport and installation requirements.
This guide explains each stage involved in producing 3D foam letters and logos for events and exhibitions.
Why Is EPS Used for 3D Letters and Logos?
EPS offers several practical advantages for temporary and semi-permanent displays. It can be used to create substantial shapes without the weight associated with timber, metal or solid plastic.
This makes finished letters easier to transport, carry and position within a venue. Large words and logos can also be split into manageable sections where access or delivery space is limited.
Common uses for 3D foam letters include:
- Exhibition stands
- Trade shows
- Product launches
- Conferences
- Award ceremonies
- Retail displays
- Brand activations
- Photography backdrops
- Weddings and private events
- Film and television sets
- Theatre productions
- Corporate celebrations
EPS can be cut into individual letters, complete words, freestanding displays or layered logo components. It can also be painted, flocked or combined with other display materials, depending on the required appearance.
Fast Shield produces polystyrene lettering and sculptures for creative and commercial projects.
Step 1: Creating the Design Brief
The first stage of how foam letters are made is defining what the finished installation needs to achieve.
A useful project brief should include:
- The wording or logo required
- Overall width and height
- The required depth
- Font or brand typeface
- Brand colours
- Quantity
- Intended viewing distance
- Indoor or outdoor use
- Freestanding, suspended or wall-mounted placement
- Delivery location
- Installation date
- Event or exhibition date
The more detailed the brief, the easier it is for the fabricator to recommend a practical production method.
Reference images are useful, but they should not replace accurate dimensions or approved artwork. If the letters must fit within an exhibition stand, on a stage or behind a reception desk, provide the exact available space.
The fabricator should also know whether visitors will be able to touch the letters. A display positioned behind a barrier may require a different finish from lettering used as an interactive photography feature.
Step 2: Preparing the Artwork
Accurate artwork is essential when producing branded lettering and logos.
Simple words may be created from an approved font file, while detailed foam logo cutouts usually require suitable vector artwork. Vector files allow a design to be resized without losing its proportions or edge definition.
Commonly requested file types may include:
- EPS
- AI
- SVG
- DXF
- High-resolution reference artwork
Accepted formats will depend on the fabricator’s production system, so always confirm requirements before sending files.
The artwork should be final and approved before cutting begins. Check spelling, letter spacing, logo proportions and trademark details carefully. Correcting an error after fabrication may require part or all of the design to be produced again.
An experienced provider of EPS foam fabrication in London can review the design and identify elements that may be difficult to reproduce at the requested size.
Step 3: Confirming Size, Depth and Proportions
The same artwork can create very different results depending on its dimensions.
Tall, shallow lettering may be suitable for mounting against a wall. Freestanding letters generally require enough depth or a suitable base to remain stable. Small details within a logo may also need to be simplified if they become too narrow or fragile at the finished size.
When learning how foam letters are made, it is important to understand the relationship between height and depth. The correct depth will depend on:
- The height of each letter
- The shape of the font
- Whether the letters must stand independently
- The floor or supporting surface
- The position of the display
- The likelihood of people touching it
- Whether additional supports will be used
- How the letters will be transported
The fabricator should review the full installation rather than judging each letter separately. Some characters are naturally more stable than others. A wide letter with a flat base will behave differently from a narrow letter or a rounded character.
Step 4: Selecting the EPS Density
EPS is available in different densities. Density can affect weight, rigidity, edge strength, surface texture and resistance to handling.
A lightweight density may be appropriate for suspended lettering, wall-mounted logos or displays that will be used once and viewed from a distance.
A denser grade may be considered for freestanding event foam letters, narrow shapes, reusable displays or installations likely to experience more handling.
Higher density is not automatically the correct choice. The fabricator should select a material that provides the required performance without adding unnecessary weight or expense.
The expected use should be discussed before production. If the letters will travel to several venues, form part of a touring exhibition or be stored for future events, this may influence the recommended material and finish.
Step 5: Cutting the Letters or Logo
Cutting is the stage most people picture when considering how foam letters are made.
The chosen method depends on the artwork, dimensions, depth, quantity and level of detail. EPS may be shaped using hot-wire cutting, CNC equipment, templates, sculpting or a combination of processes.
Hot-Wire Cutting
Hot-wire cutting uses a heated wire to pass through the foam and create a clean profile. It is well suited to many letters, numbers and large shapes with defined outlines.
The cutting path must be prepared accurately so the finished letters retain the correct proportions and spacing.
CNC Cutting
Computer-controlled cutting can support detailed, repeatable shapes. It may be used where several identical pieces are required or where the design includes more complex profiles.
The final production method depends on the shape and the equipment required to achieve it.
Hand Finishing and Sculpting
Some logos and decorative shapes require additional hand finishing. Curves, bevelled faces, rounded edges and sculpted details may be refined after the initial cut.
Fast Shield’s capabilities include hot-wire cutting, sculpturing, lettering, spheres, flocking and painted finishes. The most appropriate process will depend on the intended result.
Step 6: Assembling Multi-Part Designs
Not every design can or should be produced as one piece.
Large words, layered logos and oversized display elements may be divided into sections to make fabrication, transport and installation more manageable. Separate pieces may also be required when a logo contains multiple colours or overlapping elements.
When explaining how foam letters are made, assembly is an important part of the process. The fabricator needs to decide:
- Where sections should join
- Whether joins will be visible
- How separate pieces will be aligned
- Whether the product will be assembled before delivery
- Whether final assembly must happen at the venue
- How the installation will be supported
- Whether components need to be taken apart after the event
The delivery route should be considered at this stage. A finished logo may fit within the exhibition space but not through the venue doors, goods lift or loading area.
Dividing the design intelligently can make installation easier without affecting its final appearance.
Step 7: Preparing the Surface
Raw EPS has a recognisable beaded texture. For some creative projects, this texture may be acceptable or even intentional. Branded displays usually require additional surface preparation or finishing.
Edges may need to be checked and refined after cutting. The amount of preparation required will depend on the material density, cutting process and desired finish.
A display intended to be photographed at close range usually needs more surface attention than lettering suspended above an exhibition stand.
The viewing distance should therefore form part of the original brief. It helps the fabricator recommend a finish that is appropriate for the setting and budget.
Step 8: Painting, Flocking or Finishing
The finish gives the letters their final colour and appearance.
Options may include:
- Painted surfaces
- Flocked finishes
- Applied graphics
- Layered colours
- Decorative coatings
- Contrasting faces and edges
- Branded colour matching
Some paints, adhesives and solvent-based coatings can damage polystyrene. Products should be tested or selected specifically for compatibility with EPS.
If an exact brand colour is required, provide a recognised colour reference rather than relying on how a colour appears on a screen. Lighting inside an exhibition hall can also affect the final appearance.
When reviewing how foam letters are made, clients should ask whether finishing is completed by the fabricator and request relevant examples. Fast Shield’s gallery of previous fabrication projects can help demonstrate the range of shapes and finishes available.
Step 9: Planning Support and Installation
Letters may be designed to stand on the floor, sit on a plinth, attach to a wall or suspend from a structure. Each option introduces different practical considerations.
Freestanding letters need appropriate balance and stability. Wall-mounted letters require a suitable fixing method and permission from the venue. Suspended designs must be assessed by the relevant installation professionals and comply with venue requirements.
The fabricator should be told:
- Where the lettering will be positioned
- What surface will support it
- Whether it will be accessible to visitors
- Whether it will be exposed to moving equipment
- How long it must remain in place
- Who will install and remove it
Lightweight foam letters should not be assumed to be stable in every setting. Large installations, public spaces and outdoor locations may require additional support.
Step 10: Packing and Delivery
Packing is an essential part of how foam letters are made because the product must arrive without damaged faces, broken corners or compressed edges.
Individual letters may need protective wrapping, separators or purpose-made boxes. Painted and flocked finishes may require additional care to prevent rubbing during transport.
The delivery team should understand the size and fragility of the items. Standard parcel services may not be appropriate for oversized or unusually shaped pieces.
Fast Shield is based in London and Kent and operates its own transport across the UK. This allows delivery requirements to be considered alongside the fabrication process.
For time-sensitive events, provide the required delivery date rather than only the event date. Exhibition organisers often need the display in advance for installation, safety checks, rehearsals or photography.
Can 3D Foam Letters Be Reused?
Foam letters may be suitable for reuse if they are designed, handled and stored carefully.
Reusable lettering works particularly well for:
- Company names
- Permanent brand slogans
- Generic event messages
- Annual conferences
- Touring exhibitions
- Retail campaigns used across several locations
- Photography and media events
To support reuse, consider removable dates or campaign-specific panels rather than incorporating temporary details into the main design.
Storage should be planned before the event. Letters need a dry, protected area where they will not be crushed or exposed to damaging substances. Retaining the original packaging can help protect the surfaces and edges between uses.
What Information Is Needed for a Quote?
Now that you understand how foam letters are made, preparing a complete quotation request should be easier.
Include:
- The required wording or logo
- Approved artwork or font details
- Overall height, width and depth
- Quantity
- Preferred colours and finish
- Indoor or outdoor use
- Freestanding, mounted or suspended placement
- Whether visitors will touch the display
- Delivery postcode
- Venue access information
- Required delivery date
- Whether the letters need to be reusable
If some details are still undecided, explain the intended result and ask the fabricator for guidance.
Order Bespoke Foam Letters and Logos
Understanding how foam letters are made shows why successful event lettering depends on more than the cutting stage. Artwork preparation, material selection, dimensions, finishing, stability, packing and delivery all affect the final result.
Fast Shield produces 3D foam letters, logos, sculptures and other bespoke foam shapes for exhibitions, events, retail displays and promotional installations.
Explore Fast Shield’s wider range of foam products or contact Fast Shield with your artwork, dimensions and deadline to request a quotation.


